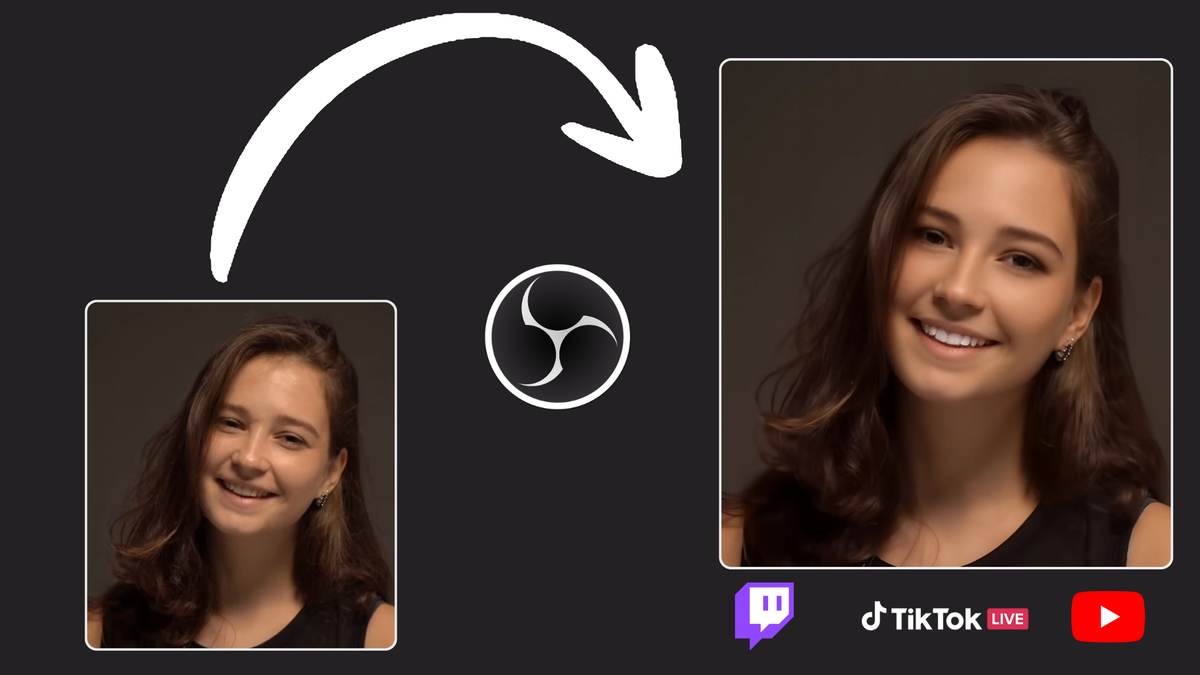
Look, we’ve all been there - you’re about to go live but you’re exhausted, your skin’s being annoying, and the last thing you want to do is spend 30 minutes on a full makeup routine just to sit in your gaming chair. Some days you just want to hit “Start Streaming” and not worry about whether your under-eye circles are showing up on camera. Plus, let’s be honest: caking on foundation for 8-hour streams isn’t exactly doing your skin any favors. That’s exactly why beauty filters exist.
The good news? You don’t need fancy equipment or expensive software to look better on stream. In this guide, we’ll show you how to add a free beauty filter to OBS in just a few minutes using Streamfog.
What Is a Beauty Filter (and Why Do Streamers Use Them)?
A beauty filter applies real-time enhancements to your webcam feed — things like skin smoothing, teeth whitening, subtle makeup effects, and face contouring. Think of it like a light Instagram filter, but for your live stream.
Streamers use them for all kinds of reasons:
To look more awake during late-night streams
To even out skin tone under inconsistent lighting
To feel more confident on camera without a full makeup routine
To maintain a consistent, polished look across streams
Makeup does the exact same thing. This just takes 10 seconds instead of 30 minutes.
Introducing Streamfog’s Beauty Lens
Streamfog is a free streaming tool that gives you access to AR effects powered by Snap’s Camera Kit — including a fully customizable Beauty Lens. If you used SnapCamera before it was shut down, this is essentially its successor, but with better integrations and more control.
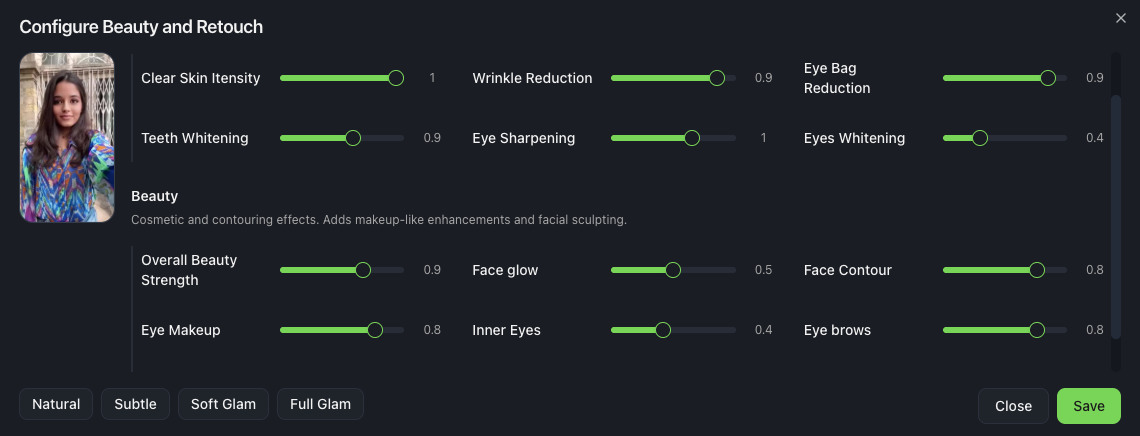
The Beauty Lens lets you adjust:
Skin smoothing — reduce blemishes and even out texture
Teeth whitening — subtle brightening for your smile
Eye whitening — makes your eyes look more awake
Face glow — adds a healthy, lit-from-within look
Face contours — subtle sculpting for more definition
Eye makeup — add eyeliner, shadow, or lash effects
Each effect has its own slider, so you can dial things in exactly how you want — from barely-there “no-makeup makeup” to full glam. There are also 4 built-in presets if you want a quick starting point:
Natural — minimal enhancement, just cleaning things up
Subtle — a bit more polish, still very natural
Soft Glam — noticeable but not over-the-top
Full Glam — the works
And yes, it’s completely free. Premium features are coming later this year, but the Beauty Lens is fully available right now at no cost.
How to Set Up the Beauty Filter in OBS
There are two ways to use Streamfog with OBS: the Browser Source method (more efficient, OBS-only) or the Virtual Camera method (works with any app). We’ll cover both.
Option 1: Browser Source (Recommended for OBS)
This method is more performance-friendly since it runs directly in OBS without needing a virtual camera layer.
Step 1: Download Streamfog
Head to app.streamfog.com and download the app for Windows or Mac. Install it and open it up.
Step 2: Add a Browser Source in OBS
In OBS, click the + button in your Sources panel
Select Browser
Name it something like “Streamfog Cam”
Streamfog will provide you with the URL to paste in — the app patches your OBS shortcut to allow camera access in the browser source
Step 3: Select the Beauty Lens
In the Streamfog app, browse the available lenses and select the Beauty Lens. Adjust the sliders or pick a preset until you’re happy with the look.
Step 4: Position and resize
Move and scale the browser source in your scene just like you would a regular webcam capture.
That’s it — you’re live with the beauty filter.
Option 2: Virtual Camera (Works Everywhere)
If you use other streaming software besides OBS, or you want to use the filter in Zoom, Discord, Google Meet, etc., the virtual camera method is the way to go.
Step 1: Download Streamfog
Same as above — grab it from app.streamfog.com and install.
Step 2: Log into Streamfog
In the Streamfog app, Login and chose your camera and resolution.
Step 3: Select Streamfog as Your Camera in OBS
In OBS, add a Video Capture Device source
In the device dropdown, select Streamfog Virtual Camera
Your filtered webcam feed will appear
Step 4: Select the Beauty Lens
In the Streamfog app, browse the available lenses and select the Beauty Lens. Adjust the sliders or pick a preset until you’re happy with the look.
This method works with OBS, Streamlabs, Twitch Studio, and pretty much any app that accepts a webcam input.
Tips for Natural-Looking Results
Beauty filters can look amazing or… obviously filtered. Here’s how to keep things looking natural:
Start with a preset, then tweak. The “Natural” or “Subtle” presets are great starting points. From there, bump individual sliders up or down based on what your lighting needs.
Less is more. It’s tempting to crank everything up, but subtle adjustments usually look better on stream. Your viewers are watching for hours — heavy filtering gets noticeable.
Match your lighting. If your ring light is already doing a lot of work, you might only need minimal skin smoothing. If you’re streaming in a dim room, the face glow and contouring can help a lot.
Check your VOD. After a stream, scrub through your recording and see how the filter looks in motion. Sometimes things that look good in a still preview don’t hold up as well when you’re moving around.
More Than Just Beauty Filters
While we’ve focused on the Beauty Lens here, Streamfog has a lot more going on — Twitch alerts, a Twitch extension, channel point reward integrations, and Streamer.bot support. It’s built specifically for streamers, not just general webcam users.
Over 30,000 streamers are already using it, and since it processes everything locally on your machine, your video feed never gets sent to external servers.
Ready to Try It?
Adding a beauty filter to your stream takes about 5 minutes and costs nothing. Download Streamfog, pick a preset (or build your own look), and you’re good to go.
Download Streamfog for free →